Help & Documentation
Template Language
- General
- Introduction
- How themes are structured
- Syntax
- Comments
- Variables
- Arrays
- Control Structures (for, if, else
- Logic
- Built-in Tests
- Expressions
- Twig: Filters & Functions
- SolidShops: Filters & Functions
- Products
- Products
- Loop over multiple products
- Load a single product
- Add product to cart
- Filter parameters
- Custom fields
- Pagination
- Categories
- Categories
- Load a single category
- Customfieldgroups
- Customfieldgroups
- Filter parameters
Introduction
The Solid template language is based on the Twig template language, a very famous template engine that is fast and really flexible. You can use all of Twig filters & functions that are needed to make the implementation of your store a breeze. We added extra features to our twig implementation so you can easely interact with the SolidShops backend.
There is no need to learn or know PHP, Ruby or any other programming language, although you will be using simple programming concepts like "loops" in your templates.
For those that already are familiar with simple PHP, ASP.NET, Ruby or any other programming language, our syntax will be super simple. For those new to programming we have kept everything as simple as possible and we are keeping documentation up to date at any time to make building templates a fun and easy to learn process.
If you need help, shoot us a message on Twitter, Facebook or via email.
How themes are structured
You'll be up in running in no time once you know the basics of how themes are structured. Take a look at any of the available themes under the "Design" tab of your store. You will see a list of available template files once you click "customize" on a theme.
We have structured our documentation in the same way that your themes are structured. The following template files can be found in any theme.
/template
Templates are the base of your design. The name of the template will be used as a router for your store. If you create a template "thisisatemplate" you can test it by navigating to http://www.yourstore.com/thisisatemplate. The following templates are required in every theme:
| Template File | Usage |
|---|---|
| cart | Your shopping cart |
| category | Show products by category |
| index | This is the homepage of your store |
| page | Template to display page details |
| product | Template to display details about a product |
| search | Search results |
/partial
These are files that can be reused through your theme. For instance for a header, footer or a product grid.
/css
Css files that will be parsed with our template language. You can use variables like {{ solid.files_url}}.
/js
Javascript files that will be parsed with our template language. You can use variables like {{ solid.files_url}}.
/lang
Language files contain a json object with all the translated fields. More information on these files can be found here.
/files
This is usefull for managing all kind of assets like images, css, files etc. If you work with bower or sass, less etc, this is the place to store these files.
Syntax
The best way to start building custom themes for your store is by skimming through our syntax examples.
This example will render an unordered list with all categories you
have in your webshop like "dvd series", "movies", "dvd-r", ... We can
use this same loop technique whenever we want to display multiple items
like products or pages. 
Comments
You can use comments within the template language, to clarify the code you have written. Use {# ... #} for that.
Variables
The SolidShops template language makes a difference between setting a variable and getting the contents from a variable. In the example below, we first declare a variable named "myname" and put the value 'Earl' in it (the quotes are just there to mark the variable as being a string.
On the second line, we print the value of variable myname by using curly braces. Note the difference in syntax when declaring a variable and when reading it out.
If you want, you can also put whole chunks of HTML in a variable.
A variable can also contain attributes, just like an array in any programming language. To access attributes of a variable use a dot (.).
As we said earlier, the curly braces in the example above are only there to print out the variable, they are not part of the variable name itself.
Arrays
Arrays can be created as follows:
If you want to create a multi-dimensional array, you can do that as well:
Control Structures (for, if, else
To control the flow of your templates, you can use conditionals or loops. Control structures are always placed inside {% ... %} blocks.
To loop over each item in a collection or array, use a for loop.
Example: loop over numbers
Example: loop over letters
Inside a for loop, you can make use of special variables if you need them. The following variables are available:
| Variable | Description |
|---|---|
| loop.index | The current iteration of the loop. (1 indexed) |
| loop.index0 | The current iteration of the loop. (0 indexed) |
| loop.revindex | The number of iterations from the end of the loop (1 indexed)) |
| loop.revindex0 | The number of iterations from the end of the loop (0 indexed) |
| loop.first | True if first iteration |
| loop.last | True if last iteration |
| loop.length | The number of items in the sequence |
| loop.parent | The parent context |
If there are no elements to loop over, you can show alternative content by using an "else" block.
Use the "if" structure to check a variable against a given value.
Use "if" to check if a variable is available, not empty or not false.
Logic
You can combine multiple expressions in if statements or for structures:
and: Returns true if the left and the right operands are both true.or: Returns true if the left or the right operand is true.not: Negates a statement.
Built-in Tests
The following is a list of built-in tests that you can use:
-
divisibleby: checks if a variable is divisible by a number
-
even: checks if a variable is an even number
-
odd: checks if a variable is an odd number
-
defined: checks if a variable is defined
-
empty: checks if a variable is null, false or an empty string
Expressions
Expressions can be used just like you would use them in PHP or similar languages. The following expressions are available:
Twig: Filters & Functions
Twig tags:
Twig functions:
Twig filters:
abs, batch, capitalize, date, date_modify, default, e, escape, first, format, join, json_encode, keys, last, length, lower, merge, nl2br, number_format, replace, reverse, round, slice, sort, split, title, trim, upper, url_encode
SolidShops functions:
random_number
SolidShops filters:
char_limit, currency, excerpt, explode, json, string_replace, strip_tags, strip_whitespace, url_decode, var_dump, weight
More information about the extra Filters and Functions that are provided by SolidShops can be found in the next section.
SolidShops: Filters & Functions
Filters and functions are useful when you want to manipulate variables or values in a certain way. Examples can be converting text to UPPERCASE or formatting a date to a certain format. The following filters can be used in your templates:
random_number(min,max)
Generate a random integer with a value between "min" and "max".
char_limit
Limit the number of characters to print from a given variable. Note that if you limit an HTML string, tags are counted as well.
currency
Format a number to a currency format of your liking.
The currency filter has several formats that you can use:
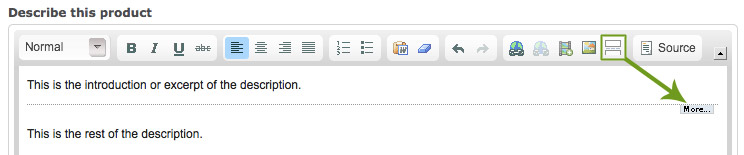
excerpt
If a user has used the "insert more break" button to define an excerpt in a product or page description, we can show only the excerpt instead of the full description by using the excerpt filter.
explode
Convert a string into an array based on a delimiter
json
Convert a data object into Javascript Object Notation (JSON)
string_replace
The string_replace function replaces all occurences of a string with a new string.
strip_tags
Strips the html and xml tags from a string.
strip_whitespace
Strips all excess whitespace (new lines, tabs, double spaces) from a string.
url_decode
Decode a given URL
var_dump
Dump a variable
weight
Format a weight to a format of your liking.
Search form
The search template file can be used to display search results in your store. Building a basic search form for your online store can be done as follows:
You can place this form anywhere in your store. It's important to use the correct action "/search" as we will post your query to your search template through the URL. Also make sure that your search text field has the attribute name="query" in it. That way we know where to get your search term.
When somebody searches for e.g. "apples" by submitting the search form above, the user will be redirected to e.g. http://yourstore.solidshops.com/search/computers
Now we need to build up the search results page, in the same consistent way we build up the products, pages and categories pages. You can find the "search" template in your theme files.
To build up a list of products that match the search term, first we need to get the search term from the url by using url segments. Take a look at the following example:
The example above gets url segment number 2 from our url http://yourstore.solidshops.com/search/computers. Now we have a search parameter "computers" which we pass to the products options.
If you want you can pass along more parameters to build in pagination or order products in a certain way. See here for more product filter attributes.
Contact form & Captcha
Some stores require a custom contact form. You can build a contact form in any of your templates. Below is a fully working example of a contact form. Let's take a look at how it's been built and how it works.
You wil need the following to create a custom contact form:
- form action="/sendmail" method="post": this will process the form and mail it to your store's contact email address.
- input fields: use whatever and as much input fields as you need. Just make sure you give them a clear name tag.
- captcha tags: these are required to prevent spam robots from sending fake emails to you.
If you want to make some fields required, you can do so by using javascript.
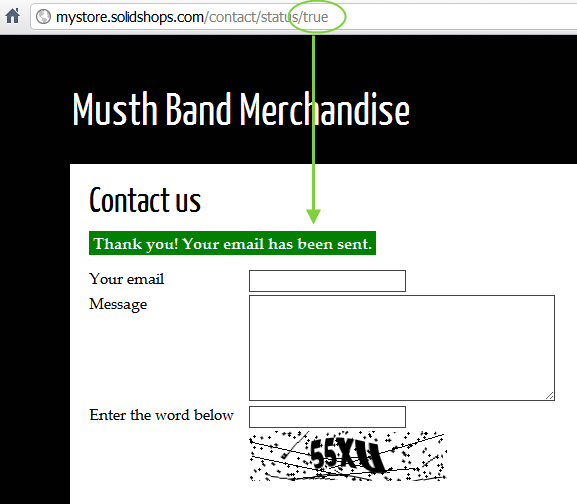
In the example above, you can see that we check url segment 3 against the word "false". When a users submits your form, we check whether or not the captcha was correct. When correct, we send and email to the contact email address you provided in your general store settings and we will create a URL like http://yourstore.solidshops.com/contact/status/true. This way you can detect if your form was sent and inform your user about this action. If the form submission fails (because of a bad captcha), we will return a URL http://yourstore.solidshops.com/contact/status/false
404 error page
404 error page
You can create a custom 404 error page by adding a 404 template to your theme.
More information can be found here.
Checkout JSON objects
On the checkout page, you can get the cart as a json object by using an ajax call.
The source code to fetch the latest cart object everytime someone clicks on the "first name field" can be found below. You need to add this javascript code to your checkout.js template
If you want to change the text on the orderconfirmation page depending on the values of the order, you can use the following javascript code to fetch the order as a json object
Checkout & confirmation css/js/partials
The checkout and orderconfirmation page can be changed by adding a checkout.js and checkout.css file to your theme.
More information can be found here:
Orderconfirmation page
You can create a custom orderconfirmation page by adding an "orderconfirmation" template to your theme.
You can use the following code snippet to print all the variables of the current order.
Custom templates
You can easely create custom templates. The template will be rendered when you navigate to http://www.ashop.com/TEMPLATENAME .
More information can be found here.
Shop attributes
You can get general information such as the current currency, the home url, ... from your shop. There is no object "shop" so the syntax is a bit different than what you are used to. The following variables are available:
| Attribute | Description |
|---|---|
| shop_name | the name of your shop |
| currency | the selected currency for your shop |
| currency_decimal | the decimal separator ( . or , ) |
| currency_thousand | the decimal separator ( . or , ) |
| currency_symbol | the symbol of the currency that is set in the backend |
| shop_url | the url of you store, http://yourdomain.solidshops.com or www.customdomain.com depending on your settings |
| assets_url | the url to your store assets (images, files, ...). You can use this to build <img> tags, or in CSS to link to background images |
| files_url | the url to your theme specific assets directory (images, files, ...). You can use this to build <img> tags, or in CSS to link to background images |
| products_count | the total number of active products in your store |
Example: create a home link
This will output:
Example: link to images and backgrounds in your assets folder
In HTML:
In CSS:
URL Segments
The Solid template language lets you access all data segments in a given URL. Let's take a look at the following URL:
By segments we mean everything that appears after your domain name, in this case "category" and "computers". Accessing these segments can be done as follows:
That will get you "category", the first segment after the domain name. To grab "computers" from the url, you simply do the following:
If you just want to retrieve the last segment, you can use the solid.getLastUrlSegment() function.
Loading CSS files
First, create a CSS file by clicking on the "add new file" button.

Once you have created and populated a CSS file, you can link it in your theme by using solid.css() as follows:
The function above will generate the following result in your template:
The solid.css() function takes two arguments:
| Argument | Value | Description |
|---|---|---|
| 1 | filename(s) | the filename(s) you are loading |
| 2 | media | standard css media types like "screen" or "print" |
Example 1: generate stylesheet link for screen.css.
Example 2: load file reset.css and screen.css (in that order) and put the media attribute to "screen"
An alternative way to link CSS files is by uploading them with the "assets manager" and just linking them with normal CSS code as you would normally do in HTML.
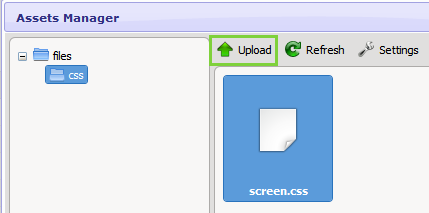
If you want to upload CSS files (or other files) e.g. when using a jQuery plugin that has a uses a number of files, you can do so like this:
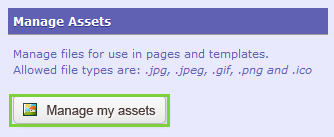
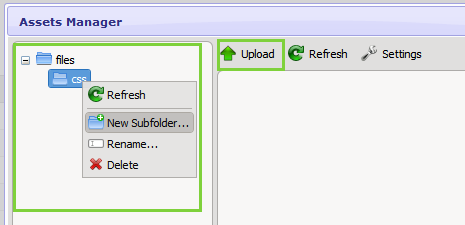
After clicking the "manage my assets" button on the right side of your screen, you can organize your assets in any way you want. Create subfolders for CSS, Js, images, ... if you want and upload the files to the location of your preference. In this example, we'll just upload a CSS file in a folder called CSS.
Now that you have uploaded an asset to your assets folder, you can link to it in the same way you are used to build html templates. Just make sure you include a reference to your assets folder {{ solid.assets_url }}.
Loading JavaScript files
Loading JavaScript files works in a similar way as loading css files. Call the function solid.js() and pass in the name of the file you want to load as a parameter, like this:
| Argument | Value | Description |
|---|---|---|
| 1 | filename(s) | the filename(s) you are loading |
This will result in the following in your template:
Example: load multiple js-files at once
This will output two links to your javascript files:
If you rather want to upload your JavaScript files to your assets folder and link to them, please read the section above about loading CSS-files. The process for linking JavaScript (or any other file) is the same as described above.
Including/embedding partials
When you are creating templates, you will probably be repeating yourself over time. For example, it's common to have the same footer or header on every template. You can save yourself some work by creating an include file for pieces of your code that are repeated in more than one template.
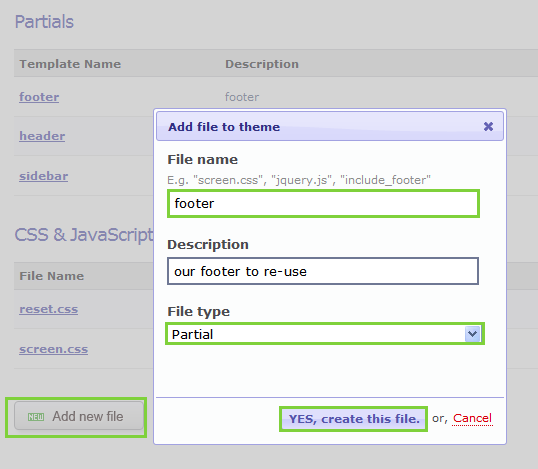
If you want to create a footer and include it in your templates, do the following:
First, create a partial called "footer", which will include a little copyright notice that we want to reuse in all our templates.
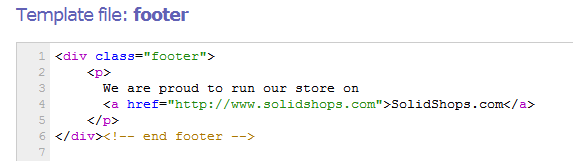
Next, put some content in the footer partial and save the file.

Now you have created a partial that you can re-use anywhere in your templates. For example, we'll want to re-use the footer in our index template, our homepage.
At the bottom of our index page, we'll load or include the partial we just created.
You are not limited to use this for footers or header. We use the embed() method to embed the same CSS file in all templates or to use the Google Font API in all our pages. Be creative!
You can also pass an extra list of parameters to the solid.embed function.
You can get the value of the parameter in your embedded template by using "{{embed.parametername}}".
Global variables
Global variables are variables that can be set in any template/partial and that can be fetched in any subsequent part of your theme. If you want to have a configurable theme you could for instance include a partial at the top of every template that sets global variables. These variables could for instance contain social media urls, api keys, layout configurations or any other kind of data.
The following code describes how you can set a global variable. You can set strings, arrays or objects.
With the solid.getGlobal() method you can fetch previously assigned variables.
Language
Language files can be used if you want to translate fields in your theme or if you just want to separate the text from your theme into different files so it's more maintainable. More information about changing the checkout language can be found here.
The following code describes how you can change the language of your store. You can use the long name of the language or the shortcode.
With the solid.solid.getLang() method you fetch the previously assigned language. If no language has been set in your theme the default language set in your backend will be used.
For each language a specific language file should exist. An example file could look like this.
From now on you can use {{ solid.lang("objectattributesunderdata")}} in your theme and it will print the value. So if you want to create a multilanguage site, you need to create multiple language files that contain the same keys and once you change the language with solid.setLang(), the correct value will be printed.
Http Parameters
A list of all HTTP querystring and HTTP POST parameters can be accessed with the following code snippet:
Products
The products template can be used to display details about a single product. The product tag can be used to access all information about your products or about one single product.
You can get the following data from any product in your store:
| Attribute | Description | ||||||||||||||
|---|---|---|---|---|---|---|---|---|---|---|---|---|---|---|---|
| id | the unique ID of your product | ||||||||||||||
| reference | the externalreference for your product. The product id in an external erp/order tracking system. | ||||||||||||||
| description | the product description | ||||||||||||||
| date_created | the creation date of the product | ||||||||||||||
| date_modified | the date you last saved a product | ||||||||||||||
| name | the name/title of your product | ||||||||||||||
| nicename | the unique name of your product | ||||||||||||||
| price | the price of the product | ||||||||||||||
| taxgroup_id | the id of the tax group | ||||||||||||||
| charge_shipping | returns 0 if no shipping cost are charged for this product , 1 if shipping costs are calculated |
||||||||||||||
| use_in_shipping_calculation | in case charge_shipping equals 0, you can change this value to 0 if you don't want to use this product in the calculation of shipping costs | ||||||||||||||
| always_available | returns true if you have indicated that users can buy this product when it's out of stock, otherwise false. Also returns true if you are not tracking stock |
||||||||||||||
| stock | the actual stock count for this product, empty if stock tracking is disabled | ||||||||||||||
| tags | the tags your entered for a product | ||||||||||||||
| thumbnail | the thumbnail image of your product | ||||||||||||||
| track_stock | returns 0 if you have disabled stock tracking , 1 if stock is tracked on product level, 2 when stock is tracked on variant level |
||||||||||||||
| url | the url to point to the detail page of this one product (system template "product") | ||||||||||||||
| weight | the weight your entered for a product | ||||||||||||||
| active | whether your product is published or not | ||||||||||||||
| popularity | the number of items that have been sold | ||||||||||||||
| categories | a loopable collection of all categories that are linked to a product Each category contains the following attributes:
|
||||||||||||||
| custom_fields | An object that contains all customfield groups. Each customfield group contains the following attributes:
|
||||||||||||||
| variants | a loopable collection of all variants that are linked to a product Each variant contains the following attributes:
|
||||||||||||||
| variant_combinations | a loopable collection of all variants combinations that are used in the product Each variant combination contains the following attributes:
|
||||||||||||||
| images | a loopable collection of all images for the current product Each image object contains the following attributes:
|
Loop over multiple products
Take a look at the following example. product.getList() will load all your products, after which you can loop over them.
Note the use of {{product.url}} in the example above. When displaying a listing of products in your store, you can use the "url" property to get a URL in the following format: http://www.myshop.com/product/46/ipad/. This will link a product to its detail page. See the next chapter for more about loading a single product.
Load a single product
To display the details of a single product, you need to edit the "product" template and get the current product details. This can easily be accomplished as follows:
Instead of .name, you can now use any of the available product attributes.
Please note that the product.get() function normally requires a "nicename" parameter. When you are on the product template, on a url like http://demostore.solidshops.com/product/productname, we will automatically read out the nicename "productname" from your url.
If you want to, you can pass in the nicename of a product in the function product.get(nicename) like so:
Add product to cart
To add a product to your shopping cart, we need to create a small form tag with a submit button, per product. This concept can be used in the "page" system template for one product or even in a list of products.
The following is necessary to add a product to a shopping cart:
1. form with action="/cart/add/{{product.id}}
2. a submit button within that form
Please notice the reference to the product id you want to add to the cart. In the following example we have added a text field named 'quantity' to allow a user to select the quantity to add. If you don't add the quantity text field, 1 will be the default quantity to add to the cart.
The product id is available when loading products using either the product.getList() or the product.get() method.
When adding products that contain variants to your cart, you have to make sure you give your users the chance to select a certain variant. You could build select boxes automatically for your products variants using the following code:
The name of your select box is important. The name value should be in the format variant_1 where 1 is the id of the variant type.
Filter parameters
It's possible to limit the products that are loaded, to only products that are e.g. in a certain category or that have a specific id. You can define filters or options like this:
Then call the getProducts() function as usual, but pass the options, like this:
Available filter attributes
| Filter | Description |
|---|---|
| cat |
filter by category name or nicename - example: SINGLE: "cat":"apple" OR: "cat":"apples|bananas" AND: "cat":["apples","bananas"] AND+OR: "cat":["apples|bananas","oranges"] |
| catExclude |
Don't include products that match this category filter- example: SINGLE: "cat":"apple" OR: "cat":"apples|bananas" AND: "cat":["apples","bananas"] AND+OR: "cat":["apples|bananas","oranges"] |
| count | the number of products on your screen or per page (if pagination is set to true) - example: "count":"10" |
| id | get one or more products by id: example: "id":"1" or "id":"1|5|3" |
| nicename | filter by product nicename - example: "nicename":"coffeecup" or "nicename":"coffeecup|cappucinocup" |
| tag | filter by product tags - example: "tag":"red" or "tag":"red|green|blue" or "tag":"red,green , blue" |
| order | id, name, price, date_modified, popularity, stock, random - example: "order":"name",
"order":"name:asc|date_modified:desc" or "order":"random" It's also possible to sort on custom fields: "custom_fields.FIELDGROUP.FIELDNAME.value:asc" |
| pagination | whether you want pagination or not - example: "pagination":"true" or "pagination":"false" |
| page | the page you want to return when the pagination param is set to true |
| search | filter by any give search term - example: "search":"pizza" |
| active | By default only the published records are returned(same as submitting value "1"). You can query all unpublished items by passing value "0" for this filter parameter. If you submit this filter with an empty value, both published and unpublished records will be returned. |
| custom_fields.CUSTOMFIELDGROUPKEY.CUSTOMFIELDKEY.value | search products that contains a specific custom field value. Works for all custom field types and supports wildcard searches by adding '%' to the value. |
Custom fields
You can add custom fields to your products. See our documentation here for details on how to easily add custom fields to your products.
To read out custom product data in your store templates, you can do the following. Please note that the examples below will only work if you already have a field group with custom fields linked to your products.
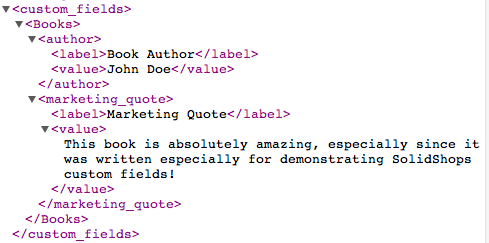
Load a product, just like you would normally do. Then, you can loop over all custom fields that are linked to a product, like so:
This will loop over all available custom fields and fields in a standard Key-Value array loop. The following screenshot gives you a visual representation of how the custom fields are structured.
If you don't want to loop over all your custom fields but need quick access to just one of your custom product fields, you can do the following:
If you don't want the value but the field label, use .label:
Pagination
If you have e.g. 50 products in your store and want to show them per 10 on a page you can use the pagination object. For pagination to work, you need to set the "pagination" parameter to "true" when you load products. See the getProducts() function just above for that.
The pagination object has the following attributes that you can use.
| Attribute | Description | ||||||
|---|---|---|---|---|---|---|---|
| pagination.pages |
A loopable collection of all pages in the pagination object.
This collection contains the following attributes:
|
||||||
| pagination.previous | The number of the previous page. This variable is empty if there is no previous page. | ||||||
| pagination.previous_url | The url to link to the previous page | ||||||
| pagination.next | The number of the next page. This variable is empty if there is no next page. | ||||||
| pagination.next_url | The url to link to the next page |
Pages
The pages tag can be used to access all information about your pages or about one single page. You can get the following data from any page in your store:
| Attribute | Description | ||||||
|---|---|---|---|---|---|---|---|
| id | the unique ID of your page | ||||||
| nicename | the unique name of your product, often used in url's | ||||||
| name | the name/title of your page | ||||||
| content | the content of your page | ||||||
| date_created | the creation date of the page | ||||||
| date_modified | the date you last modified the page | ||||||
| url | the url to point to the detail page of this one page (system template "page") | ||||||
| active | whether your page is published or not | ||||||
| custom_fields | An object that contains all customfield groups. Each customfield group contains the following attributes:
|
Loop over multiple pages
Take a look at the following example. page.getList() will load all your pages, after which you can loop over them.
Note the use of {{page.url}} in the example above. When linking to a page, you can use the "url" property to get a URL in the following format: http://www.myshop.com/pages/46/my-page-title/. This will link a page to its detail page. See the next chapter for more about loading a single page.
Load a single page
To display the details of a single page, you need to edit the "page" template and get the current page details. This can easily be accomplished as follows:
Instead of .name, you can now use any of the available page attributes.
Please note that the page.get() function normally requires a "nicename" parameter. When you are on the page template, on a url like http://demostore.solidshops.com/page/pagename, we will automatically read out the nicename "pagename" from your url. If you want to, you can pass in the nicename of a page in the function page.get(nicename), like so:
Filter parameters
Filter attributes It's possible to limit the pages that are loaded, by limiting the amount of pages loaded or by limiting them by ID. You can define filters or options like this:
Then call the getList() function as usual, but pass the options, like this:
Available filter attributes
| Filter | Description |
|---|---|
| nicename | limit the pages you load based on nicename(s): "nicename": "about" or "nicename":"about|contactus" |
| count | limit the number of pages you want to load: "count":"5" |
| order | id, name, date_modified, random- example: "order":"name", "order":"name:asc|date_modified" or "order":"random" |
| id | get one or more pages by id: example: "id":"1" or "id":"1|5|3" |
| active | By default only the published records are returned(same as submitting value "1"). You can query all unpublished items by passing value "0" for this filter parameter. If you submit this filter with an empty value, both published and unpublished records will be returned. |
| pagination | whether you want pagination or not - example: "pagination":"true" or "pagination":"false" |
| page | the page you want to return when the pagination param is set to true |
| custom_fields.CUSTOMFIELDGROUPKEY.CUSTOMFIELDKEY.value | search products that contains a specific custom field value. Works for all custom field types and supports wildcard searches by adding '%' to the value. |
Custom fields
You can define custom fields and custom field groups for your pages. Check our page documentation for more information.
To print all the custom fields for a page you can use the following code snippet:
If you don't want to loop over all your custom fields but you want to print the specific custom field value, for instance the customfieldgroup "seo" and the customfield "description", you can use the following code snippet:
If you don't want the value but the field label, use .label:
Categories
| Attribute | Description |
|---|---|
| id | the id of your category |
| parent_id | the id of the higher category |
| name | the name of your category |
| nicename | the url friendly nicename of the category |
| url | the url to point to the detail page of this one category (system template "category") |
| subcategories | a loopable collection of "category" objects |
Available filter attributes
| Filter | Description |
|---|---|
| id | limit the categories you load based on id(s): "id": "1" or "id":"1|4" |
| nicename | limit the categories you load based on nicename(s): "nicename": "about" or "nicename":"about|contactus" |
| order | id, name, random - example: "order":"name", "order":"name:asc|id:desc" or "order":"random" |
Here's an example to get you on your feet quickly when looping over all your existing product categories. The following example could be useful when building a navigation menu.
If you are using subcategories, you can render these out as well, like so:
A much used technique is the following: image you have a "category" template where you show an overview of products in a certain category or subcategory. You can load the current category your user is browsing by adding the following line to your template:
We will automatically populate the category object with the details of that category, even when it's a subcategory. When you are browsing a subcategory "shirts", you can easily print out something like:
That's great, but for search engine rankings it can be a good idea to show the breadcrumb structure with the parent category info added to it as well, like this:
Load a single category
To display the details of a single category, you need to edit the "category" template and get the current category details. This can easily be accomplished as follows:
Instead of .name, you can now use any of the available category attributes.
Please note that the category.get() function normally requires a "nicename" parameter. When you are on the category template, on a url like http://demostore.solidshops.com/category/categoryname, we will automatically read out the nicename "categoryname" from your url. If you want to, you can pass in the nicename of a category in the function category.get(nicename)
Customfieldgroups
The Customfieldgroup object contains the customfieldgroup and customfield definitions.
| Attribute | Description | ||||||||||
|---|---|---|---|---|---|---|---|---|---|---|---|
| id | The id of the customfieldgroup | ||||||||||
| name | The name of the customfieldgroup | ||||||||||
| type | The type of the customfieldgroup. "product" or "content". | ||||||||||
| fields |
|
If you want to show all the customfieldgroups and customfields available. You could use the code below:
If you want to print the details about a specific customfieldgroup or customfield, you should take a look at the code below:
Filter parameters
Available filter attributes
| Filter | Description |
|---|---|
| id | id of the customfieldgroup. |
| name | name of the customfieldgroup. |
| type | type of the customfieldgroup. "product" or "content". |
Here's an example that shows you how you can pass filter parameters to the customfieldgroup.getList() method
First, create a variable with the filters you want to pass, like so:
Then, call the getList() function, but pass in the cfgOptions:
Orders
The order variables are mostly used when customizing email templates to send out with every new order that comes in. See the code sample below for an example of how to use these variables.
| Attribute | Description | ||||||||||||||||||||||||||||||||||||||||||||||||||||||||
|---|---|---|---|---|---|---|---|---|---|---|---|---|---|---|---|---|---|---|---|---|---|---|---|---|---|---|---|---|---|---|---|---|---|---|---|---|---|---|---|---|---|---|---|---|---|---|---|---|---|---|---|---|---|---|---|---|---|
| id | the order ID | ||||||||||||||||||||||||||||||||||||||||||||||||||||||||
| reference | the reference order number, eg used in another system | ||||||||||||||||||||||||||||||||||||||||||||||||||||||||
| date_created | the date at which the order was created | ||||||||||||||||||||||||||||||||||||||||||||||||||||||||
| status | the current status of the order: pending|paid|partially_shipped|shipped|cancelled|abandoned | ||||||||||||||||||||||||||||||||||||||||||||||||||||||||
| items_quantity | the number of products in the order | ||||||||||||||||||||||||||||||||||||||||||||||||||||||||
| items_price_total | the sum of all (product.price * quantity). This amount can be incl or excl tax depending on your tax_setting | ||||||||||||||||||||||||||||||||||||||||||||||||||||||||
| items_tax | total taxes | ||||||||||||||||||||||||||||||||||||||||||||||||||||||||
| items_total | sum of all product prices, including taxes, excluding shipping | ||||||||||||||||||||||||||||||||||||||||||||||||||||||||
| shipping_cost | shipping cost for the order, excluding taxes on shipping costs | ||||||||||||||||||||||||||||||||||||||||||||||||||||||||
| shipping_tax | taxes charged on the shipping cost (if set in settings) | ||||||||||||||||||||||||||||||||||||||||||||||||||||||||
| shipping_total | total shipping costs, including taxes on shipping costs (if set in settings) | ||||||||||||||||||||||||||||||||||||||||||||||||||||||||
| discount | the total discount excluding taxes | ||||||||||||||||||||||||||||||||||||||||||||||||||||||||
| tax | the total tax of the order | ||||||||||||||||||||||||||||||||||||||||||||||||||||||||
| total | order total, including all taxes,discount and shipping costs | ||||||||||||||||||||||||||||||||||||||||||||||||||||||||
| language | the language used in the store and checkout page | ||||||||||||||||||||||||||||||||||||||||||||||||||||||||
| source | where the order is created: shop or fb | ||||||||||||||||||||||||||||||||||||||||||||||||||||||||
| payment_method | The chosen payment method. Online(authorize | ideal | mollie | multisafepay | ogone | paypalwebsitepaymentsstandard | sisow | twocheckout) or Offline(banktransfer | cashondelivery | cheque | pickup) | ||||||||||||||||||||||||||||||||||||||||||||||||||||||||
| payment_text | if you have added custom payment messages in your checkout settings page, we will load them up here, depending on the selected payment method your client has selected. If they have paid online and there is not custom payment text, we will leave this variable empty. | ||||||||||||||||||||||||||||||||||||||||||||||||||||||||
| pdf_url | the url of the pdf order document. | ||||||||||||||||||||||||||||||||||||||||||||||||||||||||
| coupon | object containing information about the used coupon
|
||||||||||||||||||||||||||||||||||||||||||||||||||||||||
| attributes |
|
||||||||||||||||||||||||||||||||||||||||||||||||||||||||
| items | a loopable collection of all items in the order
Each item contains the following attributes:
|
||||||||||||||||||||||||||||||||||||||||||||||||||||||||
| customer | object containing information about the customer that placed the order
|
||||||||||||||||||||||||||||||||||||||||||||||||||||||||
| notes | object containing the notes of the order
|
Filter parameters
| Filter | Description |
|---|---|
| count | the number of orders that will be returned - example: "count":"10" |
| id | the orders you want to show based on id(s): "id": "1" or "id":"1|4" |
| status | the status of the orders "status": "paid" or "status":"abandoned|pending|partially_shipped|paid|shipped|cancelled" |
| items.item.product_id | the orders you want to show that contain specific product ids: "items.item.product_id": "1" or "items.item.product_id":"1|4" |
| order | id - example: "id", "id:asc", "id:desc" |
Email notification example
Here's an example of how you can build up a custom confirmation email by using the available variables for an order that a customer places in your store.
Cart
Just like you can loop over products, categories and pages, you can also render your shopping cart in any layout you want. Call the shopping cart data like this:
As you might have notice you can write anything you want instead of "cart". That's just a variable name. The cart will be filled with items, once somebody has added a product to the cart.
To loop over all items in your cart, you could do something like this:
| Attribute | Description | ||||||||||||||||||||||||||||||||||||||||||||||||||
|---|---|---|---|---|---|---|---|---|---|---|---|---|---|---|---|---|---|---|---|---|---|---|---|---|---|---|---|---|---|---|---|---|---|---|---|---|---|---|---|---|---|---|---|---|---|---|---|---|---|---|---|
| cart.id | the id of the cart | ||||||||||||||||||||||||||||||||||||||||||||||||||
| cart.items_quantity | the total number of items in your cart | ||||||||||||||||||||||||||||||||||||||||||||||||||
| cart.items_price_total | the sum of all (product.price * quantity). This amount can be incl or excl tax depending on your tax_setting | ||||||||||||||||||||||||||||||||||||||||||||||||||
| cart.tax_setting | "incl" or "excl" depending on your shop settings | ||||||||||||||||||||||||||||||||||||||||||||||||||
| cart.items_tax | total taxes for the items in your cart | ||||||||||||||||||||||||||||||||||||||||||||||||||
| cart.items_total | total cost for all items in the cart, including taxes | ||||||||||||||||||||||||||||||||||||||||||||||||||
| cart.shipping_country | the country to order will be shipped to | ||||||||||||||||||||||||||||||||||||||||||||||||||
| cart.shipping_cost | shipping cost for the items in your cart, not including taxes on shipping (if set) | ||||||||||||||||||||||||||||||||||||||||||||||||||
| cart.shipping_tax | taxes charged on shipping costs (if set) | ||||||||||||||||||||||||||||||||||||||||||||||||||
| cart.shipping_total | total shipping cost for the items in your cart, including taxes | ||||||||||||||||||||||||||||||||||||||||||||||||||
| cart.discount | the total discount excluding taxes | ||||||||||||||||||||||||||||||||||||||||||||||||||
| cart.tax | the total tax of the cart | ||||||||||||||||||||||||||||||||||||||||||||||||||
| cart.total | grand total of your shopping cart, including taxes, discount and total shipping cost | ||||||||||||||||||||||||||||||||||||||||||||||||||
| cart.url | the url to the cart | ||||||||||||||||||||||||||||||||||||||||||||||||||
| cart.language | the language used in the store and checkout page | ||||||||||||||||||||||||||||||||||||||||||||||||||
| cart.coupon | object containing information about the used coupon
|
||||||||||||||||||||||||||||||||||||||||||||||||||
| cart.attributes |
|
||||||||||||||||||||||||||||||||||||||||||||||||||
| cart.items |
|
Here's a complete shopping cart example to get you started:
Please note the line where we have added a field with name="quantity_{{ item.id }}". When you name the field that way, SolidShops can automatically detect what product (and variant if you used one) you are changing the amount for.
If you want to give the user the opportunity to select his ship-to country, you can do this by calling the method solid.htmlShippingCountries(). This will roll out a list of available destinations to ship to, based on your shipping preferences.
Add product to cart
To add a product to your shopping cart, we need to create a small form tag with a submit button, per product. This concept can be used in the "page" system template for one product or even in a list of products.
The following is necessary to add a product to a shopping cart:
1. form with action="/cart/add/{{product.id}}
2. a submit button within that form
Please notice the reference to the product id you want to add to the cart. In the following example we have added a text field named 'quantity' to allow a user to select the quantity to add. If you don't add the quantity text field, 1 will be the default quantity to add to the cart.
The product id is available when loading products using either the product.getList() or the product.get() method.
When adding products that contain variants to your cart, you have to make sure you give your users the chance to select a certain variant. You could build select boxes automatically for your products variants using the following code:
The name of your select box is important. The name value should be in the format variant_1 where 1 is the id of the variant type.
Add a product to your cart with AJAX
Adding a product to your shopping cart without a page refresh isn't a complicated task, if you have some basic jQuery knowledge. What needs to be done is post the product ID (and optionally the selected product variants if you have any) to a url that returns the full cart.
Now, on you page where you want your customer to be able to to add the product to your cart (in a lot of cases this will be your "product" template), we will need a button that says "Add to cart" or something similar. Make sure you have a button like this in that template:
Notice the class name "btnAddToCart" that we have added to the button. We will use this to add a click handler to that button.
We also add a small placeholder div where we can show feedback like "You have 3 items in your car" after the AJAX call has succeeded. It doesn't matter where on your page you place this.
There are a few things you need to pay attention to to make this work.
- 1. we are using template variables like {{ product.id }}. That means you need to place the javascript code on a page where you have product-variables available. Depending on how you have built your templates, you may have {{ p.id }} instead of {{ product.id }} available in your tempaltes. Double check that value before you continue.
- 2. don't forget to link up a recent version of jQuery before loading your jQuery code.
Here's what your AJAX-call written in jQuery can look like. Of course, the code below needs to be put within script-tags like all javascript code.
Doing an AJAX-call to /cart/add/ will return a result in JSON format like this:
That way, it becomes easier for developers to customize how a store should behave after adding a product to the shopping cart without a page refresh. If you need additional help, get in touch with support and we'll help you out! Happy coding!
Remove item from cart
Sometimes or even most of the times you may want to provide a "remove item" option in your shopping cart. We will need a form that posts the correct product ID that has to be removed, like so:
This link (or it can be an image, as long as it links to the correct url) needs to be available next to every item in your shopping basket, so you can e.g. put it in a table within your {% for item in cart.items %} loop.
Delete cart
If you want to delete your entire cart instance (without javascript) you can use the following code snippet:
Cart attributes
You can add up to 10 attributes to each cart item and 10 to the cart itself. These attributes are used to add some extra customer fields to the cart. Some implementations are fields like "customer engraving","cartnote","deliverydate".
item attributes:
For each item in your shopping cart you can define up to 10 attributes.
product / add to cart:
cart template:
cart attributes:
For your shopping cart, you can define up to 10 attributes.
cart template:
Checkout language
By default, the checkout language is read from the setting in your SolidShops backend. You can overwrite this default language by passing an "checkout_language" field to the cart.
Coupons
If you want to add coupons to your cart, you just need to submit a form element with the name "coupon".
Shipping countries
Generating a default combobox with all the countries you have chosen in the SolidShops backend can be done with the following code snippet.
Tax Rules
The tax object contains information about your tax settings and percentages.
The tax object contains the following method and data.
| Attribute | Description |
|---|---|
| id | the id of your tax rule |
| taxgroup_id | the id of the applicable tax group |
| taxgroup_name | the name of the applicable tax group e.g. Shoes or Default Tax |
| country | the country code for the tax rule e.g. US |
| region | the region or province code e.g. QC. Empty unless country is US or CA |
| percentage_individual | the tax percentage to charge to a private individual e.g. 10.00 |
| percentage_company | the tax percentage to charge to a company e.g. 10.00 |
Read on for code examples, available methods and filter parameters.
Loop over multiple tax rules
Use the method tax.getList() to get all tax rules.
Here's an example of how you could show the different tax rules.
Filter parameters
Available filter attributes
It's possible to limit the tax rules that are loaded, e.g. for a given country or state.
Here are the filter parameters that can be passed to the tax.getList() method.
| Filter | Description |
|---|---|
| id | the id of the tax rule |
| country | limit the tax rules to those that affect certain destinations. E.g. FR for one country (France in this case) or FR|UK|NL for multiple countries |
| region | limit the tax rules to those that affect certain states or provinces. E.g. CA for one state (California in this case) or NV|NM|NY for multiple states |
| taxgroup_id | the id of the tax group |
| order | Order the tax rules, e.g. "order":"country:asc|state:desc" |
| count | limit the number of tax rules to load, e.g. "count":"3" |
Here's an example that shows you how you can pass filter parameters to the tax.getList() method
First, create a variable with the filters you want to pass, like so:
Then, call the getList() function, but pass in the taxOptions:
Shipping Rules
The Shipping object contains information about your shipping settings. This data can be used in your templates to display or calculate shipping costs for an order or item.
The shipping object contains the following method and data.
| Attribute | Description |
|---|---|
| id | the id of your shipping rule |
| country | the country code, e.g. BE for Belgium |
| type | the type of shipping rule. This can contain price, weight or amount depending on what type of shipping you have set |
| price | contains the minimum price for this shipping rule. Empty unless "type" is set to price |
| weight | contains the minimum weight for this shipping rule. Empty unless "type" is set to weight |
| amount | contains the minimum amount of products for this shipping rule. Empty unless "type" is set to amount |
| cost | the shipping cost |
Read on for code examples, available methods and filter parameters.
Loop over multiple shipping rules
Use the method shipping.getList() to get all shipping rules.
Here's an example of how you could show the different shipping rules.
Filter parameters
Available filter attributes
It's possible to limit the shipping rules that are loaded, e.g. for a given country.
Here are the filter parameters that can be passed to the shipping.getList() method.
| Filter | Description |
|---|---|
| id | id of the shipping rule |
| country | limit the shipping rules to those that affect certain shipping destinations. FR for one country or FR|UK|NL for multiple countries |
| order | Order the shipping rules, e.g. "order":"country:asc" |
| count | limit the number of shipping rules to load, e.g. "count":"3" |
Here's an example that shows you how you can pass filter parameters to the shipping.getList() method
First, create a variable with the filters you want to pass, like so:
Then, call the getList() function, but pass in the shippingOptions:
Let's get social shall we?
We'd love to know what you think. Join the conversation about your hosted e-commerce solution.