Help & Documentation
Settings
- Receiving payments
- Introduction to payments
- PayPal
- 2Checkout
- Authorize.Net
- Ogone
- Sisow
- Mollie
- MultiSafePay
- Cash on delivery
- Shipping
- How do I set my shipping rates?
- I want to ship to a few countries only, is that possible?
- Taxes
- How do I set taxes?
- What are tax groups and how can I use them?
- Domain
- How do I configure a custom domain name for my shop?
Introduction to payments
In order to receive payments from your clients, you can add different payments methods that you want to accept. For example, you can choose to accept different methods of payment like "bank transfers", "cheques", "cash on delivery" or automatic online payment methods like credit cards, PayPal and more.
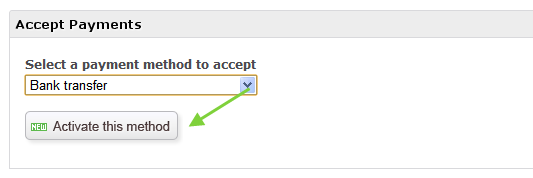
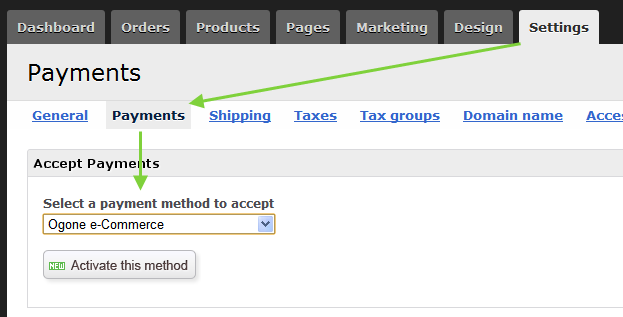
If you want to start accepting payments, head over to "settings -> Payments" in your admin interface and activate the method of your choice. For example, here we will activate "Bank transfers" for a store that wants their clients to pay with a normal manual bank transfer. We will check manually if a payment has been received or not.
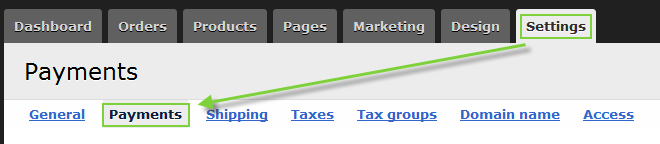
Select the payment method you want to accept from your clients and click the button that says "activate this method".
For every payment method you add, a screen will come up to help you configure the chosen payment method. In our case, we have chosen "bank transfer" and can now provide our bank account number and payment instructions that our customers will see when they pay through this payment method.
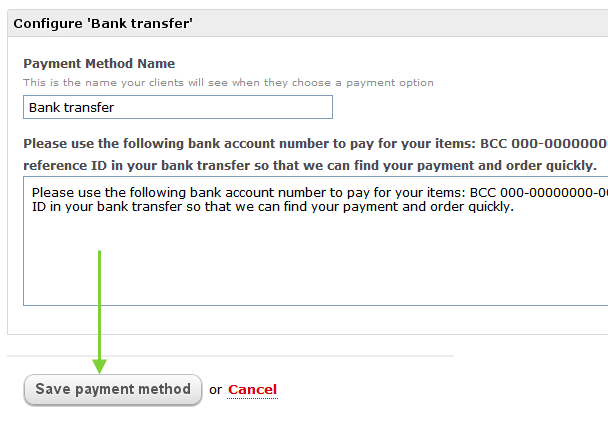
Once you have saved your settings, you will see that the payment method has been added to the table below with the status "Active".

That's all you need to do to start accepting payments. Of course, there are easier ways to accept payments like PayPal or by accepting credit cards online. To automatically accept money online on your store, you will need to have a so called payment provider.
Among the most popular payment providers you will find PayPal, Ogone and others which all allow you to accept payments with VISA, Mastercard, American Express and other credit cards. We will cover all supported payment providers in our documentation below.
PayPal
To start accepting payments with PayPal, you will need to sign up for an account with them. Instructions on how to do this can be found in this blog post.
Please note that we will never charge you transaction costs per sale unlike our competition. However, payment providers will typically charge you a percentage per sale you process through them. If we could change the industry we would, but just like the large telephone companies, payment providers are unlikely to change their business model in the near future.
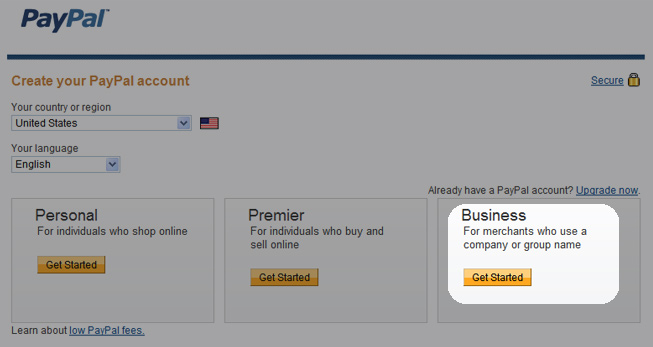
If you want to start accepting payments with PayPal, do the following to create an account with them:
1. sign up for an account here
2. select "business"
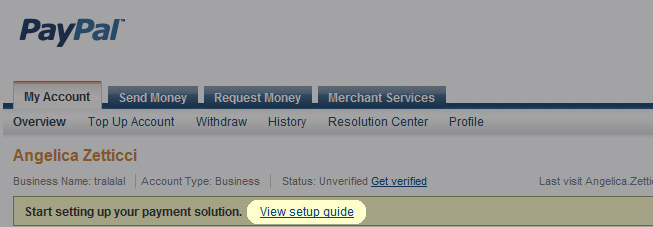
3. go to their setup guide
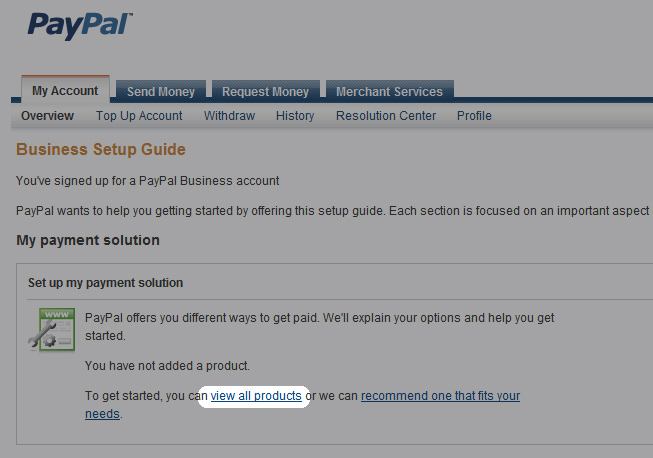
4. add "Website Payments Standard" to your account

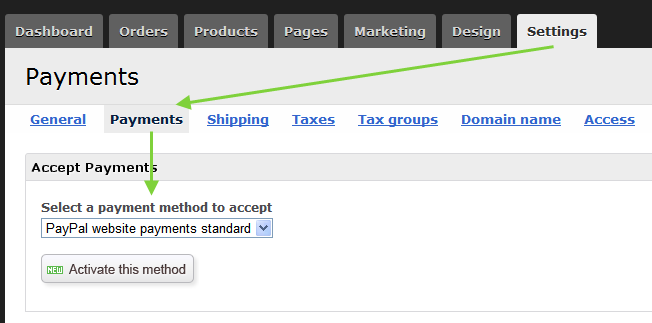
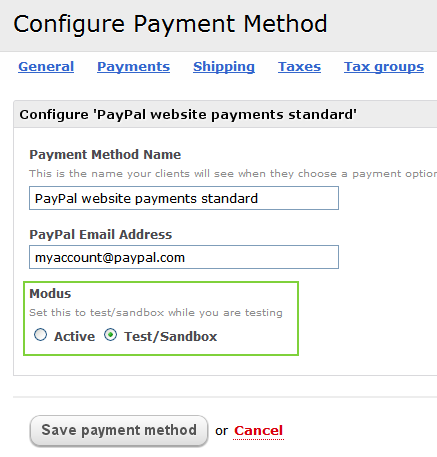
Once that you have your PayPal account, simply go to your SolidShops administration interface and go to your payment methods via "settings -> payments" and activate PayPal website payments standard.
On the configuration screen, add your PayPal email address and you'll be all set. Please note that we have included an option to test your PayPal configuration in sandbox mode. When you select Test/Sandbox mode, you will be able to go through the complete checkout process of your store, but there will be no real transactions made.
We encourage you to do this once and when all tests have succeeded, put the payment provider in "Active" mode to start processing real payments through your account.
2Checkout
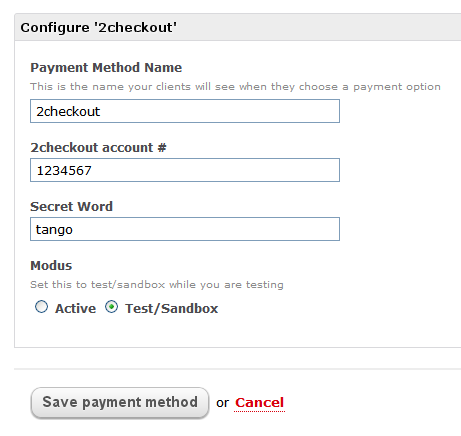
If you have a vendor account with 2Checkout, you can link it up to your SolidShops store by going to "settings -> payments" in your admin interface.
From there, activate the payment method named "2checkout" and enter the following parameters when you are presented with the 2checkout configuration screen. The necessary parameters can be found after logging into your 2checkout account at https://www.2checkout.com/va. Contact 2checkout if you need help finding your parameters or contact us if you require further assistance.
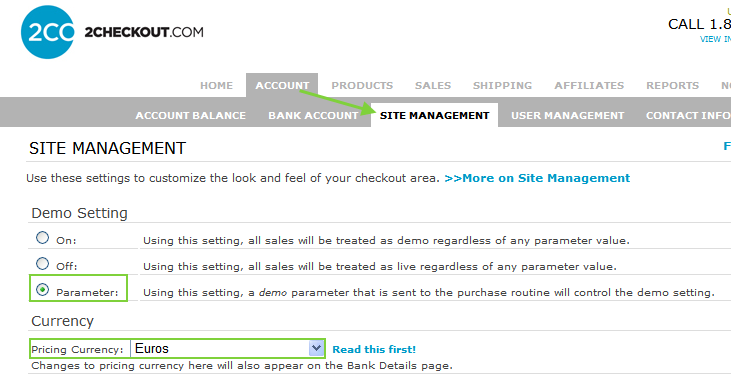
After logging into your 2checkout account, go to "account -> site management" to set the following parameters:
- Demo Setting: set this to "Parameter"
- Pricing Currency: set this to the same currency as your store's currency
Authorize.Net
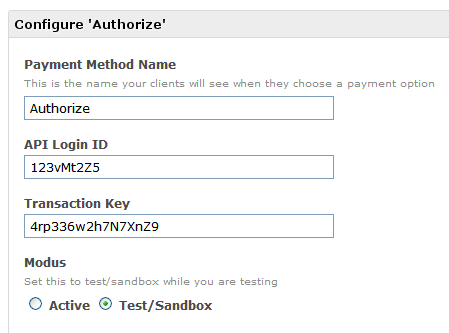
If you have a merchant account with Authorize.Net, you can link it up to your SolidShops store by going to "settings -> payments" in your admin interface.
From there, activate the payment method named "Authorize" and enter the following parameters when you are presented with the Authorize configuration screen. The necessary parameters can be found after logging into your Authorize account at http://www.authorize.net. Contact Authorize if you need help finding your parameters or contact us if you require further assistance.
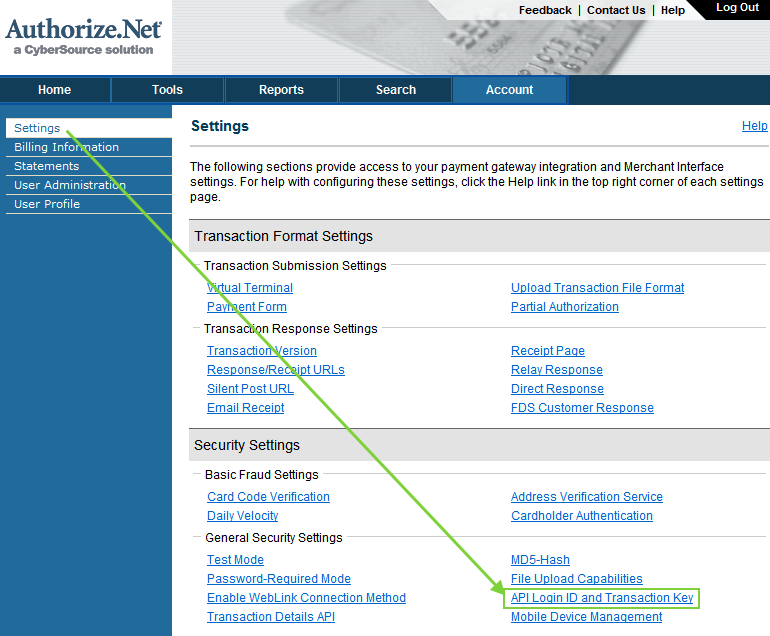
Enter your API Login ID and Transaction Key in your SolidShops store as follows:
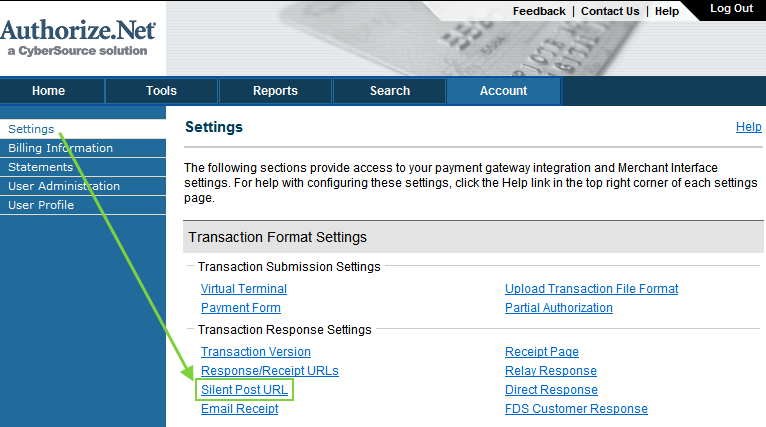
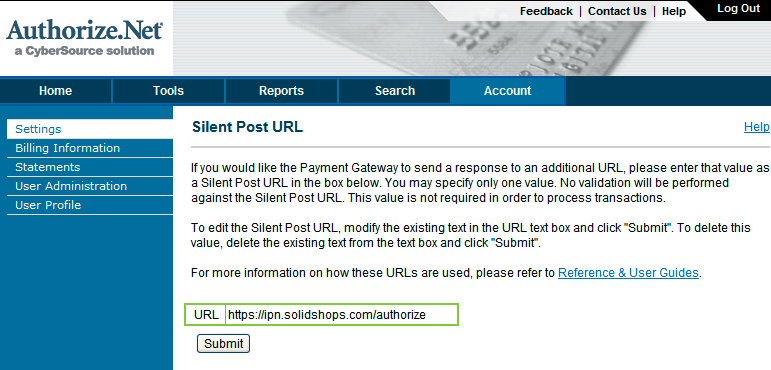
After logging into your Authorize account, go to "account -> settings" and set the following parameter:
- Silent Post URL: set this to "https://ipn.solidshops.com/authorize"
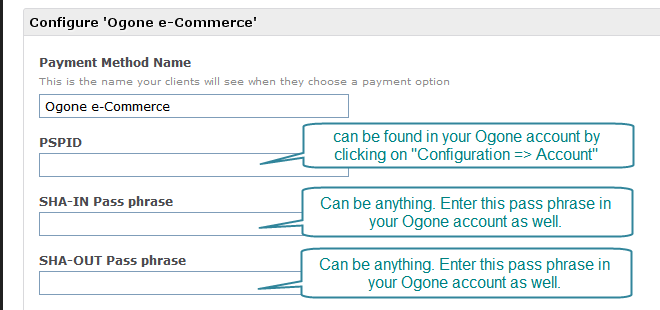
Ogone
SolidShops supports Ogone e-Commerce which enables you to receive and process payments with over 40 different payment methods.
Register for an account on http://www.ogone.be and select "Ogone e-Commerce" as your product of choice. Ogone will verify your account details and will send you a confirmation email after the validation of your business information has been done.
Once you have a working account you can login at http://www.ogone.be and configure your account in the following way.
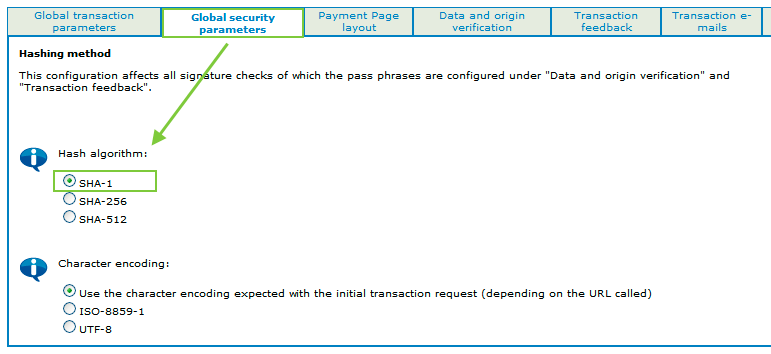
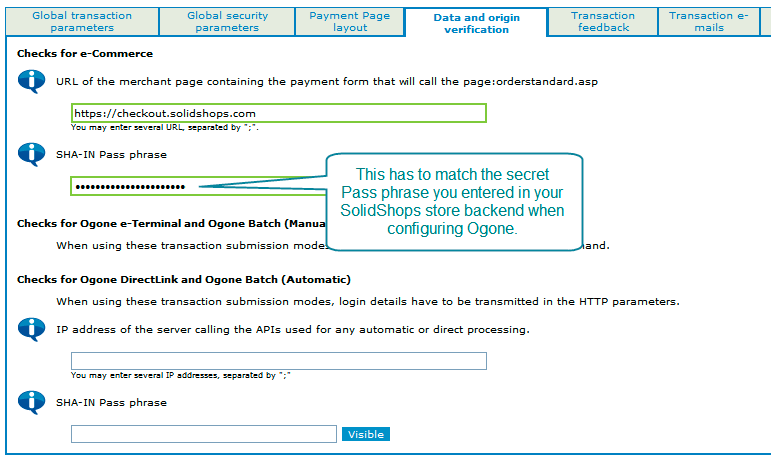
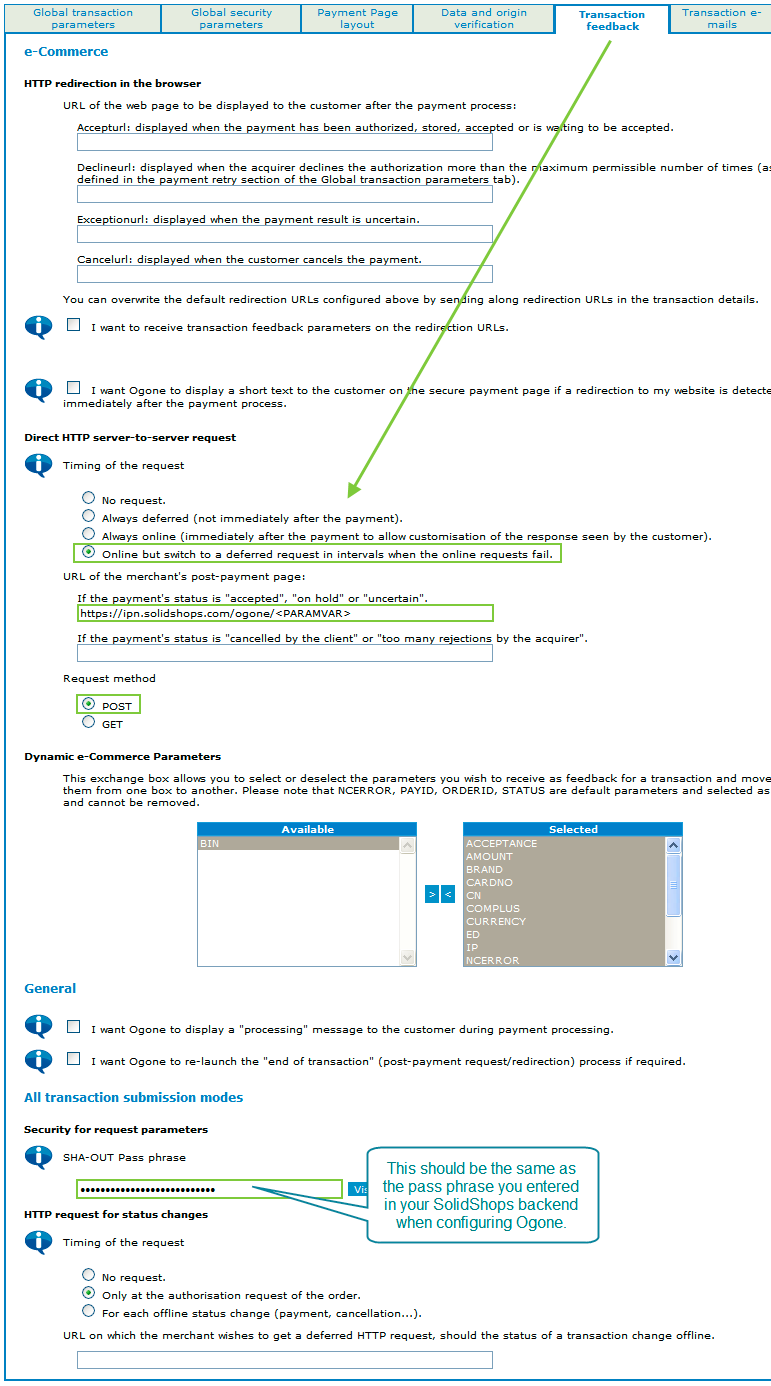
After configuring Ogone on their own websites, log into your SolidShops store and go to "Settings / Payments" where you can add and configure Ogone e-Commerce:
Sisow
Sisow supports iDEAL, Mister Cash, credit cards and other payment options. If you have an account with them, login at http://www.sisow.nl and locate your "Merchant ID" and "Merchant Key". You can find the information after logging in and clicking on the "Mijn Profiel" link.
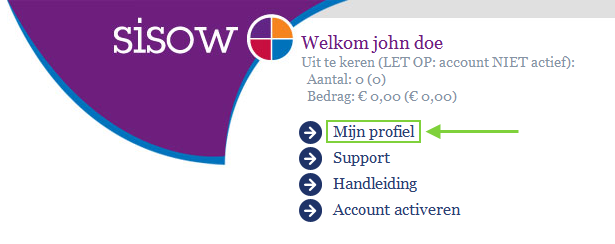
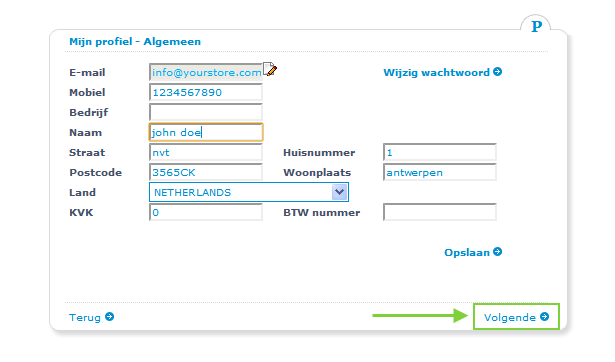
You Merchant ID and Key are a bit hidden in the Sisow interface. Click on the "volgende" link once you are on your profile page, like in the screenshot below.
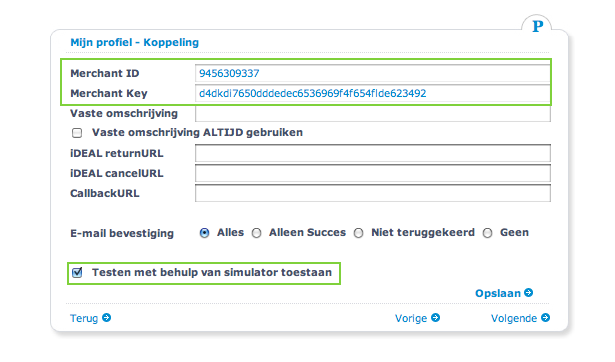
NOTE: if you want to test your Sisow integration in Sandbox-mode, make sure to check the box that says "Testen met behulp van simulator toestaan". For those not too familiar with Dutch, that means "allow testing with our simulator".
Now we need to configure this information in the store by logging in and going to "Settings -> Payments". On that screen, activate Sisow as your payment method and enter your Merchant ID and Key in the corresponding fields.
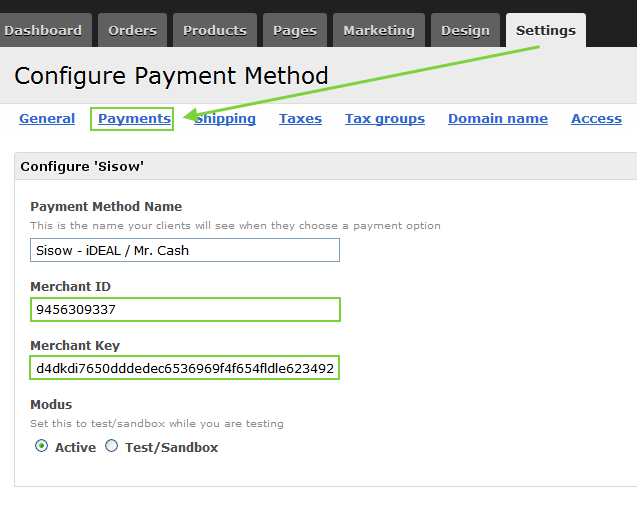
Save these settings and you're all set.
Mollie
Mollie supports supports iDEAL. The information SolidShops needs can be found here:
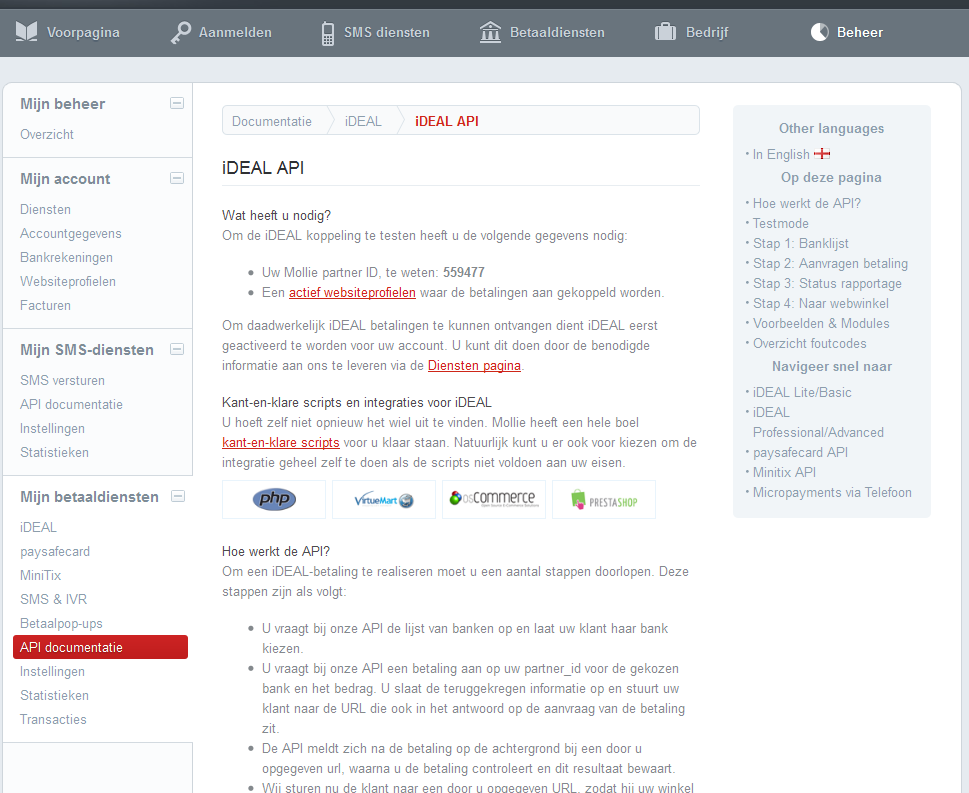
Now we need to configure this information in the store by logging in and going to "Settings -> Payments". On that screen, activate Mollie as your payment method and enter your "Partner ID" and "Profile ID" in the corresponding fields.
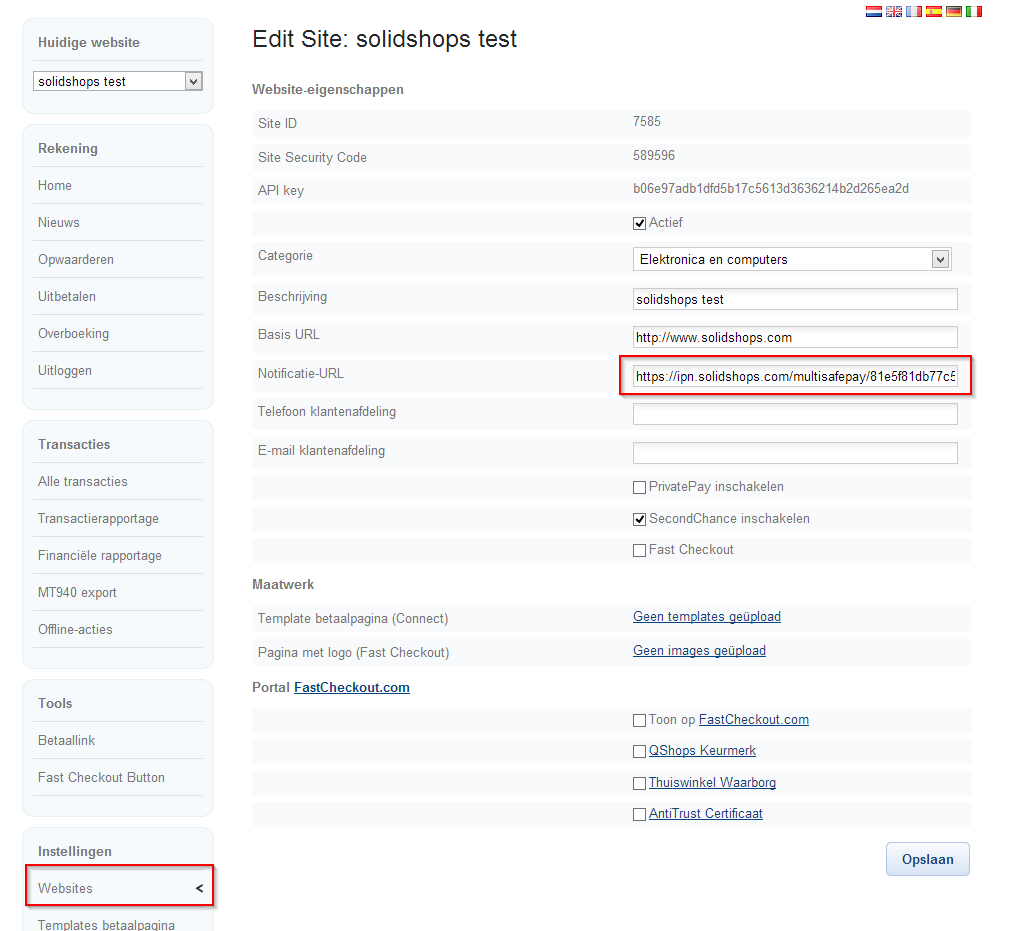
MultiSafePay
MultiSafePay supports supports multiple payment methods.
In the SolidShops backend you need to configure your MultiSafePay "Account ID","Site ID" and your "Site code".
Afterwards, you need to copy and paste the "Notification url" that is displayed in your SolidShops backend into the Multisafepay "Notificatie-url" field(screenshot).
Cash on delivery
If you have a physical store or you want your customers to be able to pick up their order at a physical location, you probably don't want to charge shipping costs on those orders.
Select the payment method named "Cash on delivery" from the available payment methods to allow people to just pay for your order when they come pick it up in your store. When selecting this payment method, shipping costs will NOT be charged to your customer.
How do I set my shipping rates?
As a shop owner you need to decide for yourself how much shipping costs you want to charge your clients. If you don't know what rates you should charge, contact your local post office, they'll be happy to help you out.
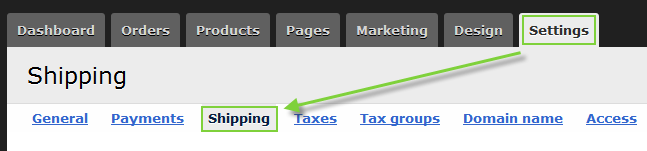
Once you have an idea on what shipping costs you would like to charge, you can set them on the "Shipping" page. Click on the "Settings" tab and then the "Shipping" subtab as follows:
You have the choice to charge shipping costs based on three factors:
- Price
- Weight
- Number of items
Here are a few examples to give you an idea of how these three options can be used.
Example 1: "Shipping based on Price": somebody who sells clothes wants to charge the following:
| Order value | Shipping costs |
|---|---|
| All orders up to $ 29 | $ 10 |
| All orders from $ 30 and up | Free shipping |
In this example, the shop owner wants to reward people that buy for more than $30 at once save on free shipping. The shipping rules in this case would be set as follows:
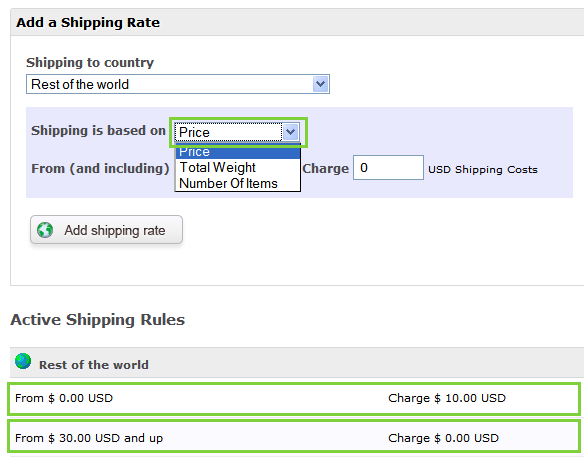
As you can see in the screenshot above, the store owner is shipping to "Rest of the world", meaning that he or she will be shipping to any country in the world. If you only want to ship to certain countries, remove the "Rest of the world" from your active shipping rules and only add those countries you want to ship to.
Example 2: "Shipping based on Weight": somebody who sells chocolate wants to charge the following:
When charging shipping costs based on the total weight of an order, your products will need to have a weight associated with it. The weight of a product can be entered when adding a product.
| Order weight | Shipping costs |
|---|---|
| Orders below 1 kilo | $ 9 |
| Orders between 1 and 2 kilo's | $ 12 |
| Orders above 2 kilo's | $ 15 |
Example 3: "Shipping based on number of items": somebody who sells movie posters wants to charge the following:
| Order Items | Shipping costs |
|---|---|
| 1-3 posters | $ 5 |
| 4-10 posters | $ 8 |
| More than 10 posters | $ 15 |
These examples just show you different ways to charge for shipping. Pick the method that best suits your personal needs. Please note that you cannot mix shipping types for one shipping destination.
I want to ship to a few countries only, is that possible?
Yes. In your settings/shipping page, remove the option "rest of the world" from your active shipping rules and only add the countries you want to ship to.
How do I set taxes?
Setting taxes is pretty straightforward in most cases. However, sometimes it's necessary to charge a different tax percentage depending on the kind of product you are selling or even depending on the region you are shipping to.
For example: in Europe it's necessary to charge taxes when selling and shipping to customers in your own country. On the other hand, when somebody from another country in Europe buys the same goods, there are no taxes to be charged.
To solve this, you would add the country (let's take Belgium) to the Taxes table and enter the tax percentage to charge when somebody from Belgium buys goods form you. Next, add other shipping destinations and set how many taxes need to be charged for those customers, depending on their location.
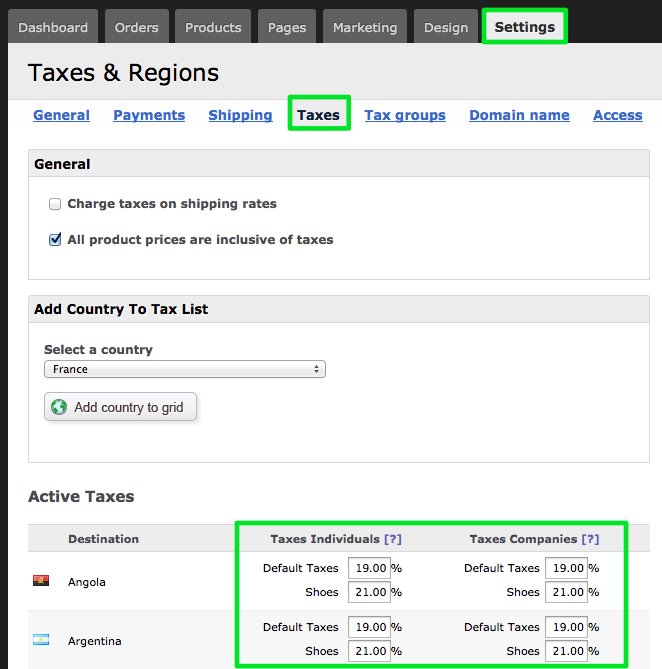
Also, depending on where your store is located, you will only need to charge taxes to companies, not to private individuals. Just enter your correct tax percentage in the column on the left for indiviuals or on the right for companies.
We will automatically make a distinction between private individuals and companies depending on whether or not somebody has entered a company/VAT ID on checkout.
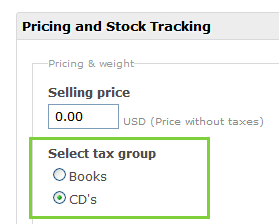
What are tax groups and how can I use them?
Tax groups can be used to charge a different tax percentage depending on the product type you are selling. For example: in Europa some countries require you to charge 6% of taxes on books, but 21% on CD's or most other products.
Because we'll be selling books and CD's in this example, we'll create two tax groups:
- Books
- CD's
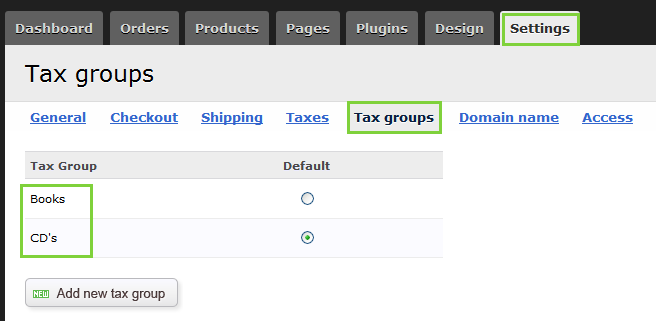
When entering taxes in your Settings/Taxes page, you can now enter a different tax percentage for each tax group.
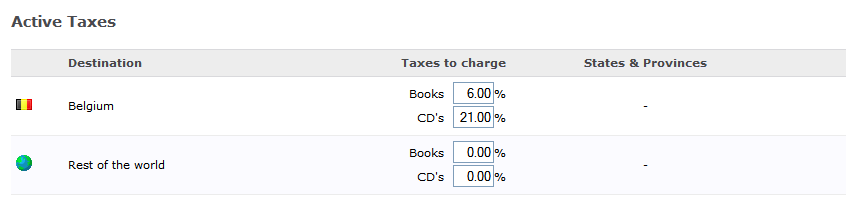
Now when you are adding products to your store, make sure you select the correct tax group for each of your products.
How do I configure a custom domain name for my shop?
You can use your own custom domain name like http://www.yourshop.com instead of the default subdomain format http://yourshop.solidshops.com by pointing the DNS record of your domain name to our servers.
In order to do this, you will need access to the DNS settings of your domain. If you don't know what we are talking about here, please contact your webmaster or hosting company and let them make the changes for you.
First, activate your custom domain name in your settings/domain page:
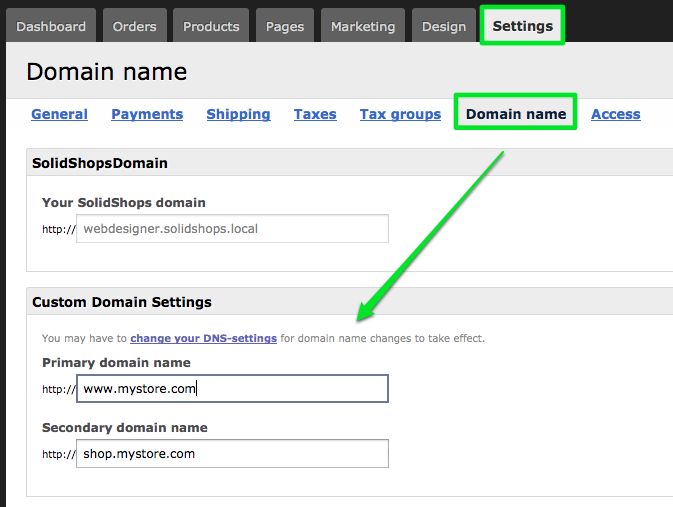
Note that you can link two domain names if you want. The primary domain name is the domain name that will be visible in search engines. When you decide to link two domains to your store, we will automatically redirect the secondary domain name to your primary one, in order to avoid duplicate content issues in search engines.
After that, create a CNAME record on your domain name like "www" and point it to your SolidShops domain "yourshop.solidshops.com".
Depending on the control panel you are using to configure your domain name, this will look like this the screenshot below. Please notice the "." at the end of the domain name.

Please note that changes to DNS settings can take up to 24 hours to propagate throught the Internet. This is a normal timespan for any DNS change on the Internet and the waiting time for this is not related to SolidShops in any way.
Let's get social shall we?
We'd love to know what you think. Join the conversation about your hosted e-commerce solution.